Sunday, 3 January 2021

Fiber optics for the Home Network


“We cannot live only for ourselves. A thousand fibres connect us with our fellow men; and among those fibres, as sympathetic threads, our actions run as causes, and they come back to us as effects. ” – Henry Melville

Fiber optics networking, is normally expensive and fragile. Telecoms-grade equipment come to mind. Maybe we even have a broadband fiber to the house (helpfully called FTTH). This usually ends in a telecoms-supplied box, Passive Optical Network (PON) into which we plug out usual copper (ie RJ45 UTP) LAN cable.


Fiber broadband usually ends in copper LAN connection


But why would I even want fiber for home LAN? Regular readers will know my house is on a hill which regularly gets struck by lightning. We get used to being off-grid for the duration of the storm, which happily is not usually long. But it would be nice not to have damaged electronics. Even better if we can cut over to UPS and keep watching IP TV or youtube. If my copper LAN cable runs are too long (maybe 30m) lightning often damages the network switches, or even fuse the UTP connectors together.

A Huawei ONT 'fiber modem' commonly supplied with Unifi fiber broadband


Or you might want more reliable and secure links for your security cameras/CCTVs which are often outdoors and at the end of long cable runs. Maybe you want to share your neighbor's broadband connection. 

Or maybe you simply want to speed up/secure that wireless WiFi repeater for when you are at one end of the garden. High speed WiFi is well and good, but once your neighbors have theirs installed the airways can get pretty crowded. 

Fiber LAN often means using telecoms equipment which are not only expensive but often not available to the general public. First, the fiber optic cable. Your best chance would be to use the type that your local telecoms monopoly/behemoth uses. High manufacturing volumes usually mean lower prices. Here in Malaysia it is  G.657 Class A single mode fiber.  A 1000m roll of outdoor cable costs less than RM200 (USD50) and even RM100 (USD25) if you are willing to order from mainland China. That is comparable to a 300m roll of copper Cat 5 UTP LAN cable. 

1km roll of G.657 Class A single mode fiber


But fiber cable is more fragile? Yes, if you used the equivalent indoor drop cable. The outdoor cable is often extremely strong. Mine consisted of not one but 3 steel cables reinforcing the fiber cable. I have had tree branches pulling it almost to the ground and the fiber core remained unbroken. They are often stronger than the copper UTP cables.

Outdoor fiber cables are often extremely strong

The outdoor fiber cable is far more heavy but they are still smaller than the Cat 5 or 6 copper cable. It is surprisingly bendable, considering fiber optics is a glass. And since there is no ohmic contact, you can run the cable parallel to the mains cables, in the same cable trays or conduits. This greatly reduces cabling costs.

Most indoor fiber is limp and frail


OK, but what about the fiber optic interface to the computer? A single mode single core fiber cable specifications are something like this:


The last line reads 850/1300nm: it carries just 2 light frequencies. If you need more channels you need to run another cable. The traditional multi-mode cables carries lots of frequencies, but with a price tag to match.

Poor cousin: single-mode versus multi-mode fiber


We will be needing something to convert between UTP and fiber: two fiber modems, one at each end. As usual the Chinese have something cheap and cheerful (only RM25/USD5) called a media converter: the HTB-3100.
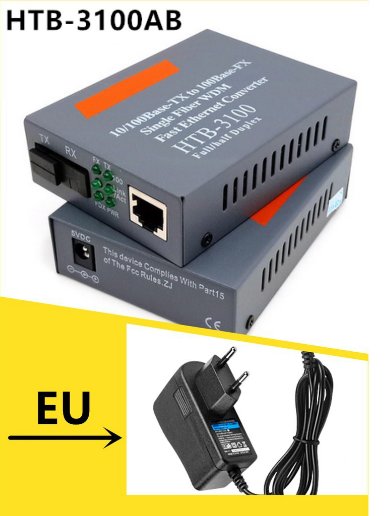
The HTB-3100A and HTB-3100B are sometimes sold as a matched  pair

Now this being a Chinese no-name box, be careful to look for a media converter that has only one fiber SC UPC port. The picture above shows two (marked TX and RX) but only the TX port can be uncovered. If you, like me, happen to buy the dual-port box by mistake you will need to lay 2 fiber cables for every copper UTP connection. You want to look for WDM (Wavelength Division Multiplexing). To carry 2 channels in one fiber, it transmits in one wavelength, 1550nm and receives at another, 1310nm. That is Type A. Type B is just the reverse, transmitting at 1310nm and receiving at 1550nm. You will be needing one unit of each type. They are often sold in matched pairs.

Both the single fiber and dual fiber media converters might be labelled as Half/Full Duplex. My guess is this refers to the UTP (ie RJ45 or copper) end. These days most CAT5 or CAT6 copper LAN cables come with both TX and RX pairs, and Half Duplex might be when Ethernet is negotiated down to CSMA/CD. 

Last but not least there is the complex matter of cutting, splicing and terminating your fiber optic cable. Years ago, it took expensive equipment, highly-trained operators and extremely clean conditions, which are sometimes difficult to do on-site. But for now there is and end-run, a workaround. Again from the Chinese. You can buy the cables already terminated for very low prices. Like RM36 for 50m. That is just USD9.

Pre-terminated outdoor single mode fiber cable.

Some suppliers will do it to a custom length. Just make sure the connector is SC UPC (it is easy to specify the incompatible SC APC or LC connectors). Now I had coax 10Base2 concealed LAN wiring installed in my house (yes, yes I am a dinosaur), so it was an easy matter to rip it out of the conduits and install the smaller fiber cable in it place.

The aim is to replace your long copper cable runs with fiber. One benefit is if the cable run is over 100m you do not need to install the repeaters (ie LAN switches) that UTP Ethernet needs. If you add in the cost of the power wiring, enclosures, the savings quickly pile up.

The aim is to replace long copper LAN cable runs with fiber (in red)


It worked so well I ran another 100m fiber cable outdoors to my home office so I can share the broadband. The system has been in place through several violent thunderstorms and one fallen tree and did not miss a beat.

If you live in Malaysia, you are in luck, for Talikom Malaysia, the telecoms monopoly mostly uses sub-contractors to install your FTTH fiber cable. For a very reasonable fee, not exceeding the cost of a roll of fiber cable, they can be persuaded to do your internal house fiber cabling. In my case it was money well spent for much of the work involved climbing onto the roof. A huge advantage is they will splice and terminate your fiber cable using proper equipment, resulting in a very good connection.

The only thing left would be an inexpensive way to cut, join and terminate a fiber cable myself. But that is for another post.

Happy Trails. 


Thursday, 17 December 2020

RESTful IoT with privacy & security: How to set up a Debian HTTPS Server


"It is quiet here and restful, and the air is delicious. There are gardens everywhere and police spies lie in the bushes ... " - Maxim Gorky

It is very tempting to use the ubiquitous HTTP web protocol for IoT. It is easy to test, and lets you operate your IoT from smartphones, tablets, desktops and even a computer program. Such a setup is called RESTful. It simply means your IoT device speaks the language of the web browser and web server. 


So we rush ahead with our RESTful API, and the IoT device is soon working and indispensable. Pretty soon we realize we need security and privacy: it won't do to have a hacker open the voice-controlled garage door ...

Our first line of defense is our WiFi password. It is reasonable to assume those living in the house should have access to WiFi and IoT. But what if we had guests or lodgers? Changing WiFi passwords can be a real bear, especially if you have 20-odd IoT devices. In fact it makes sense to localize the changes to a dedicated IoT server. RESTful, naturally.  

We will be needing some form of authentication: account names and passwords should do for now. Next we will need a reasonable amount of privacy, i.e., encryption so that someone else should not be able to lift the IoT password off the WiFi. That means HTTPS, or HTTP with SSL.

We start by implementing HTTPS server on a Linux system. The ESP8266 is known to be a little wobbly running HTTPS. ESP32 is better, but we can do without the complication for now. The traditional way is to use Apache. There are other, easier ways (like nginx, nodejs and even python) but Apache lets you run multiple servers right off the bat. This means you can keep your bad old HTTP server, add another HTTPS server on top of that and lets you support both your HTTP and HTTPS IoT devices.

From a bog-standard Debian (mine is a Beaglebone on eMMC), do the usual:

# apt-get update

# apt-get upgrade

Next, get Apache:

# apt install apache2

And while you are at it, you might as well make sure you have ssh. I got my DNS from duckdns.

Apache should come up complete with the stock webpage at http://localhost. Put your webserver files at /var/www/html/

To access the webserver from outside your WiFi access point, you will need a DNS server, but once you get it organized, a bog standard browser will display a warning before it will display your home page:


That means you need SSL, which usually costs money. You can opt for a self-signed certificate but this will produce a warning with most browsers. You then elect to disregard the warning and proceed, but this is a real problem if you are trying to sell the IoT device.

One way out is to get a 90-day certificate free from sslforfree. You just have to register, input your domain name and prove that you have access to the webserver, usually by uploading an sslforfree file to it. After it checks out the certificates can be downloaded. sslforfree links to a youtube video describing the process.

Do check out the video. I will simply list the differences relevant to a Debian installation. In Debian it is a simple:

# a2enmod ssl
Considering dependency setenvif for ssl:
Module setenvif already enabled
Considering dependency mime for ssl:
Module mime already enabled
Considering dependency socache_shmcb for ssl:
Enabling module socache_shmcb.
Enabling module ssl.
See /usr/share/doc/apache2/README.Debian.gz on how to configure SSL and create s
elf-signed certificates.
To activate the new configuration, you need to run:
  systemctl restart apache2

I now need a configuration file for my HTTPS (or SSL) webserver. There is a template in Debian:

# cp /etc/apache2/sites-available/default-ssl.conf /etc/apache2/sites-available/secure.cmheong.duckdns.org.conf

secure.cmheong.duckdns.org being the domain name of my new HTTPS server. The parameters for the new server are put in:

# cat /etc/apache2/sites-available/secure.cmheong.duckdns.org.conf | head -n 16
<IfModule mod_ssl.c>
        <VirtualHost _default_:443>
                ServerName secure.cmheong.duckdns.org
                ServerAlias www.secure.cmheong.duckdns.org
                ServerAdmin webmaster@secure.cmheong.duckdns.org

                DocumentRoot /var/www/html

                # Available loglevels: trace8, ..., trace1, debug, info, notice, warn,
                # error, crit, alert, emerg.
                # It is also possible to configure the loglevel for particular
                # modules, e.g.
                #LogLevel info ssl:warn

                ErrorLog ${APACHE_LOG_DIR}/secure.cmheong.error.log
                CustomLog ${APACHE_LOG_DIR}/secure.cmheong.access.log combined

You then check your configuration and do not proceed further until this passes:

# apachectl configtest
Syntax OK

Make sure your webserver is now accessible from the Internet. Usually this means setting up Port Forwarding in your gateway to forward all port 443 traffic to your server IP address.

# systemctl restart apache2

You will then need to prepare for the sslforfree test of webserver and domain name ownership:

# mkdir /var/www/html/.well-known
# mkdir /var/www/html/.well-known/pki-validation

Register with sslforfree, download the challenge file they provided and put it in the new directory. This is where the Debian ssh installation comes in handy. 

If the sslforfree challenge succeeds, then the certificates and private key will be generated as a zip file.

# unzip secure.cmheong.duckdns.org.zip
Archive:  secure.cmheong.duckdns.org.zip
 extracting: certificate.crt
 extracting: ca_bundle.crt
 extracting: private.key

You then move them to their final secure directories:
# cp -v ./sslforfree/*.crt  /etc/ssl/certs
'./sslforfree/ca_bundle.crt' -> 'certs/ca_bundle.crt'
'./sslforfree/certificate.crt' -> 'certs/certificate.crt'

# cp  ./sslforfree/private.key  /etc/ssl/private/private.key

Remember to delete the ./sslforfree directory. If you want to put the certificates in a different place you will need to update the site config file accordingly:

# cat /etc/apache2/sites-available/secure.cmheong.duckdns.org.conf | grep -i SSLCerti
                #   SSLCertificateFile directive is needed.
                #SSLCertificateFile     /etc/ssl/certs/ssl-cert-snakeoil.pem
                #SSLCertificateKeyFile /etc/ssl/private/ssl-cert-snakeoil.key
                SSLCertificateFile      /etc/ssl/certs/certificate.crt
                SSLCertificateKeyFile /etc/ssl/private/private.key
                SSLCertificateChainFile /etc/ssl/certs/ca_bundle.crt

As usual test the Apache configuration:

# apachectl configtest

And then restart Apache:

# systemctl restart apache2

The just aim your Chrome browser at https://www.yoursecureserver.com. If it worked you get something like this:


Now the traffic to and from the IoT RESTful server is encrypted. Note the sslforfree certificates expire in 90 days, but you are free to generate a new set. They will even email you a reminder. 

There you have it: a secure Internet-facing RESTful IoT server.

Happy Trails.

Thursday, 26 November 2020

AS3935 Lightning Detector with I2C and ESP8266 NodeMCU ESP-12E


AS3935 Lightning Detector with I2C on ESP8266 NodeMCU ESP-12E

There are several good posts on the AS3935 with Arduino Atmel CPUs, and some with ESP8266, including code, but these tend to publish only wiring diagrams for Arduino. So, this post no big deal, really to document a working example of CJMCU AS3935 with I2C on ESP8266 NodeMCU ESP-12E.

CJMCU AS3935 Lightning Detector

The wiring is:

AS3935                                  ESP-12E
    SCL                                    D1/GPIO5
    MISO                                  D2/GPIO4
    IRQ                                     D5/GPIO14
    VCC                                   3.3V
    GND                                   GND

In addition tie the AS3935 pins A0, A1 and SI to 3.3V

AS3935 I2C wiring for NodeMCU ESP-12E

The choice of D5 for interrupt line was guided by the excellent randomnerd reference. D3 and D4 seemed a lot more intuitive, but the ESP8266 failed to boot.

Unlike my previous posts on the AS3935, I thought it might make a change to use the one of the AS3935 libraries in the Arduino IDE database, specifically stevemarple's AS3935.h. Just navigate to 'Sketch' drop-down menu, then select 'Include Library' and then 'Manage Libraries'. 

Under 'File' and 'Preferences' you need to have the URL: http://arduino.esp8266.com/stable/package_esp8266com_index.json

The code is slightly modified from stevemarple's example to make it compile. I have uploaded a copy to github.

#include <AsyncDelay.h>
#include <SoftWire.h>
#include <AS3935.h>
#ifdef JTD
#include <DisableJTAG.h>
#endif
AS3935 as3935;
bool ledState = true;
AsyncDelay d;
ICACHE_RAM_ATTR void int2Handler(void) // 2020-11-22
{
  as3935.interruptHandler();
}

void readRegs(uint8_t start, uint8_t end)
{
  for (uint8_t reg = start; reg < end; ++reg) {
    delay(50);
    uint8_t val;
    as3935.readRegister(reg, val);
    Serial.print("Reg: 0x");
    Serial.print(reg, HEX);
    Serial.print(": 0x");
    Serial.println(val, HEX);
    Serial.flush();
  }
  Serial.print("State: ");
  Serial.println(as3935.getState(), DEC);
  Serial.println("-------------");
}
bool NoiseHigh = false;
bool Disturbed = false;
void printInterruptReason(Stream &s, uint8_t value, const char *prefix = nullptr)
{
  if (value & AS3935::intNoiseLevelTooHigh) {
    if (NoiseHigh == false) {
      if (prefix)
        s.print(prefix);
      s.println(F("Noise level too high"));
      // NoiseHigh = true;
    }  
  }
  if (value & AS3935::intDisturberDetected) {
    if (Disturbed == false) {
      if (prefix)
        s.print(prefix);
      s.println(F("Disturber detected"));
      // Disturbed = true;
    }
  }  
  if (value & AS3935::intLightningDetected) {
    if (prefix)
      s.print(prefix);
    s.println(F("Lightning detected"));
  }
}

void setup(void)
{
#ifdef JTD
  disableJTAG();
#endif
  Serial.begin(115200);
  // as3935.initialise(14, 17, 0x03, 3, true, NULL);
  as3935.initialise(4, 5, 0x03, 3, true, NULL); // 2020-11-22
  // as3935.calibrate();
  as3935.start();
  d.start(1000, AsyncDelay::MILLIS);
  while (!d.isExpired())
    as3935.process();
  Serial.println("Before setup:");
  readRegs(0, 0x09);
  // attachInterrupt(2, int2Handler, RISING); // 2 is believed to be D4, GPIO2
  attachInterrupt(14, int2Handler, RISING); // 2020-11-22 Chose D5 GPI14
  // attachInterrupt(digitalPinToInterrupt(5), int2Handler, RISING); // 2020-11-22 Chose D3 GPIO0
  d.start(1000, AsyncDelay::MILLIS);
  Serial.println("setup() done");
  readRegs(0, 0x09);
  as3935.setIndoor(true);
  as3935.setNoiseFloor(4);
  as3935.setThreshold(4);
  as3935.setSpikeRejection(0); // From AS3935_timestamp_demo.ino
  
  //as3935.calibrate();
  //Serial.println("Calibration done");
  //readRegs(0, 0x09);
  Serial.println("Masking Disturber interrupts ...");
  as3935.setRegisterBit(as3935.regInt, 5, true);
  readRegs(0, 0x09);
  pinMode(LED_BUILTIN, OUTPUT);
  digitalWrite(LED_BUILTIN, ledState);
}
uint8_t count = 0;
void loop(void)
{
  if (as3935.process()) {
    uint8_t flags = as3935.getInterruptFlags();
    uint8_t dist = as3935.getDistance();
    /*
    Serial.println("-------------------");
    Serial.println("Interrupt!");
    Serial.println("Reason(s):");
    */
    printInterruptReason(Serial, flags, "    ");
    
    if (AS3935::intLightningDetected & flags) {
      Serial.print("Distance: ");
      Serial.println(dist, DEC);
    }
  }
  if (as3935.getBusError()) {
    Serial.println("Bus error!");
    as3935.clearBusError();
  }
  // Flash the LED to show activity
  if (d.isExpired()) {
    ledState = !ledState;
    digitalWrite(LED_BUILTIN, ledState);
    // // Periodically output the AS3935 registers
    // if (++count > 5) {
    //  count = 0;
    //  readRegs(0, 0x09);
    // }
    d.start(1000, AsyncDelay::MILLIS);
  }
}


NodeMCU Base board Ver 1


I also used a baseboard V1 for my NodeMCU V3 Lua Lolin ESP-12E. Do take note of the different versions as the baseboard does not fit many of the cheap ESP-12E out there. The baseboard is just for convenience, really and you can wire the AS3935 directly to the ESP-12E. 

I was getting a little low on USB cables and had many 12V and 9V DC power supplies left over from dead TP-Link and Dlink ADSL modems. The voltage range is acceptable to the baseboard and the power jack fits. 

Have fun. I know I did. Happy Trails.

Thursday, 5 November 2020

Once more unto the breach, dear friend, once more ... APC Back-UPS RS1000 Repair


APC Back-UPS RS1000

I first encountered it 13 years ago, in 2008. Even then it was past its prime, bought at a private auction for peanuts. It started up, then indicated 'overload' and shut down. Back then I needed to learn about UPS and the RS1000 was a nice roomy design and a large PCB which seemed easy to work with.

Main PCB: top of picture is front of UPS. Charging section is on the bottom left corner


You took out the screws and lifted the front cover from the middle in 2 sections. The bottom half covered the battery compartment. The top front flap had to be pried off together with the right side cover, and comes off with a nasty crack. Once exposed it was easy to reconnect the sections for testing.

Important: Do Not Attempt this Repair unless you are qualified. Not only there are hazardous voltages inside, it will continue to be hazardous if the UPS is disconnected from the mains. In additional since there are switch-mode power modules inside, connecting an oscilloscope to it will result in damage, fire or death.

It sat in my study for 2 months before I found the fault: there were two shorted MOSFETS, Q1 and Q2, IRF740. Replaced that plus a blown fuse and it worked again. I had a good guess at the root cause: there were signs a gecko used to live there. The nice roomy UPS must have been a good place for a gecko to keep warm.

Typical Malaysian house gecko 


It was some 9 years, in 2015 before it was brought in for repair again.  It started up, indicated 'overload' and shut down. Call me simple, but I went straight to the battery charging circuit. This time a deceased and mummified gecko was still in there. 


Bad Neighborhood: An IoT Power Extension used for lamps has a lot going for a gecko: lots of insects attracted to the light. It is warm, dry and safe from kingfishers, rats and other predators.  There is just one problem ... electrocution


Again two shorted IRF740s, this time Q1 and Q3. The PCB was getting a little beat up with the second rework, but it started up nicely.

It was a little quick to switch over to battery operation, but you could decrease the sensitivity by turning it off, then holding the button down until all 3 lights lit up. Then you pressed the button again to select: one light for minimum sensitivity. 

And back it goes into service. It came back 5 years later, about 4 months ago this year. This time there was nothing wrong, and everything wrong: the owner did not need it anymore. Desktop computers are now notebooks with 3 hour or more battery life and there is little use for a UPS with a backup time of 15 minutes.

For four months it backed up my npm server, a laptop. During one long power outtage, it got quite hot and right after that would not go back to 'online' mode even after the power came back. There is AC power in its non-battery-backed power sockets, and it charged the batteries when it is shut down. But when it is started up, it tests the batteries, then the mains voltage, and switches to battery operation. 

Perhaps after a few years its 'Line Sense' circuit had deteriorated. Maybe a gecko had set up shop in it again. My first thought was to throw it out: there was little use for it. But then a half-hearted google search turned up the full schematics for it!

Well maybe one last hurrah. If I moved my npm server to a raspberry pi 3, it should be able to run on battery for 2 hours or more.


So off with the cover. This time there was no gecko. Just the 'Line Sense' problem. The components are surface-mount but just about large enough to handle without an airgun.

The first opamp in IC8 (LM358) is a difference amplifier. It reads the incoming mains AC directly, using 2M series resistors to step down 325V (230Vac nominal is 325 Vpeak) to around 3V.


Line Sense (IC8). CPU is at top center.


The second opamp is (I think) a precision half-wave rectifier which is read directly by the CPU analog input. The 'Sync Circuit' output is connected to the CPU digital input, probably used to sense zero crossings for a smooth switchover.

When I measured the resistance of the resistors, diodes and opamps (with power off and circuit discharged!) they seems OK, nothing short or open-circuited. Next would be a power test. Plugging in the battery alone did not produce power at the LM358.

But plugging in the AC mains (with the UPS still shut down) did. 12V supply came up. But the negative rail '-8V' seemed a little low at -4.2V. Now the AC mains Live is connected to the opamp inverting input, and it can only go as negative as its voltage rail. The precision rectifier will rectify it to the correct polarity for the CPU analog input. If the negative rail is not low enough, the Live voltage sensed will correspondingly drop. This seems to square with the observed fault.

So we go on to the -8V power schematic.


Maybe the designer is old-school, but this is a flying-capacitor charge pump, straight out of the textbooks. Most of the kids would have dropped in a cheap surface-mount DC-DC IC. The CPU digital output line 'pumps'  CHRG_PUMP_OSC at a fixed frequency. This provides 12V on an off to the 'flying' capacitor C40 which charges up to 12V via Q25.

C20 is prevented from discharging by the diodes D21. Their polarities ensure that the output is negative, which allowing for diode forward drops and Q25's Vce, -8V seems a reasonable final output.

But what could be wrong?  There is some output, just a little low at -4.2V. Q25 or Q26 could be defective. It could be D19 shorting or D21 leaking. But the most likely is C41 and C40 has lost most of their charge. Electrolytic capacitors contain electrolyte, and is likely to dry out. They have a shelf life of 6 months before they are out of spec. And it has been, what, 12 years?

Again, with power off and battery disconnected and the PCB allowed to discharge, diode-tested the diodes and transistors (a bipolar transistor is simply 2 diodes stacked up). They seemed OK. This leaves the capacitors.

220uF test capacitor soldered across C41. 
 

To test the capacitors C40 and C41 it seemed easiest to simply parallel a new capacitor across the old one. In fact just adding one capacitor should improve the resulting output power. If possible, over-size the rating (I used 220uF) a little as the old one will act more as a load. I simply soldered it across C41.

On connecting the battery and mains voltage the voltage went up to -5.8V. And even better, when the UPS was started up, it tested the battery, then switched to 'online' mode!

For final repair, I ordered some surface-mount 22uF capacitors. There is nothing wrong with my 'test' capacitor, but the capacitor is heavy and lies horizontally when the RS1000 is upright and as a result may work itself loose after a few years.

[2020-11-10 update]: With new (Panasonic EEEHD1C220AR) SMD 16V 22uF electrolytic capacitors for C40 and C41, the negative rail "-8V" now measures -9.2V. Element14 is not the cheapest, but they hold local stock and I really did not want to wait 4 weeks with the UPS innards scattered over the work table.

So, it is "once more into the breach, dear friend". It's better to soldier on. Better the line of fire than the storage shelf.

Happy Trails. 

"How dull it is to pause, to make an end, To rust unburnish'd, not to shine in use!" - Tennyson, 'Ulysses'


Saturday, 26 September 2020

AS3935: The Next Generation Episode 3


"The drama's done. Why then here does any one step forth? — Because one did survive the wreck" - Herman Melville, 'Moby Dick'

It's been a strange dry season - there wasn't one. Instead of the choking haze from the fires of Indonesia, August and September brought only rain and thunderstorms. The AS3935 survived them all, until now. As usual the AS3935 detector flagged the oncoming storm. Since the lightning appears to come from the phone copper lines, esp8266 relay modules were used to disconnect the phone line from the ADSL modem. The modem is powered from a float-charged NS60 12V automotive battery. The battery charger, too was disconnected from the mains, both Live and Neutral, so as to deny the strike a path to Earth.

In order to reconnect after the storm an esp8266 4-channel module itself is powered from the same battery, but a separate 2-channel esp8266 relay module is used to disconnect the ADSL phone lines. The ADSL relay module itself is also disconnected from its 5V power supply, as previous strikes tended to jump from the relay contacts to the 5V/GND lines powering the relay coils.

The esp8266 and as3935 modules are wirelessly linked via MQTT server. 


On Thursday Sep 24, a nearby strike came in via the ADSL line, and flashed over the open relay contacts. This destroyed the 2-channel relay module (including the attached esp8266) and propagated along the 5V power line over to the 4-channel relay contacts. There it flashed over the open relay contacts to the 12V-5V buck converter and damaged it. This resulted in a short-circuit across the 12V battery and also damaged the 13.8V CC CV module used to float-charge the battery. There is no direct connection to Live, Neutral or Earth (the 4-channel relays were off).

The 4-channel relay is the only component along the strike path which survived.

From right: lightning strike along the ADSL line flashed over the relay contacts to the 5V power lines. Insulating tape was used to reduce severity of flashover


Note the burn mark along the 5V power PCB trace 


Burned area: relay coil 5V pin near relay contact connected the surge to the 5V power system and spread via the LM1117 to the ESP8266 via the 3.3V output. It also propagated to the  12V-5V buck converter

12V-5V buck converter had shorted output schottky diode SS34

13.8V CC CV float charge module takes unregulated 18Vdc and puts out 13V8 constant current constant voltage. Its output schottky diode SS54 was shorted, effectively shorting the battery

Sole survivor: 4-channel relay module used to disconnect power to battery charger and to ADSL relay module


The lightning strike must have been really close because it also took out my autogate controller and damaged lights a few houses down the street. Unlike Captain Ahab, this is where I concede defeat. After 25 years, the lightning won and I disconnected the ADSL system. 

Henceforth the future is fiber-optic. In fact it was operating concurrently with the ADSL modem when the lightning struck and it survived unscathed. At least I had Netflix.

Happy Trails.


"And I only am escaped alone to tell thee." -- Job

Sunday, 9 August 2020

If at first you don't succeed, try try again: Flashing an old Beaglebone Black eMMC


2019 Hugo Award for Best Novelette: Zen Cho

Back in 2016 I bought a few Beaglebone Blacks, but did not get round to using them. I guess they were superseded by the later-model Raspberry Pi's. 


Beaglebone Black


The Pi has always been less reliable than the Beagleboard or Beaglebone. Broadcom USB subsystem was especially flaky and since the Pi USB bus handled both disk IO as well as Ethernet, you are often SOL as Broadcom is not really reknown for fixing things. Little things like industrial temperature rating of 85 degrees Celsius. And having to run Linux from sdcards, which are certain to wear out. Even worse the full-size sdcard sockets fail after a few years. Luckily the later Pi models use microsd sockets, but I am still stuck with a bunch of Pi Model Bs and their flaky sdcards.

The Pi had irresistible things going for it. It was way cheaper, had more addon modules (ie 'hats'), and best of all, it had Debian. There was no longer the month-long struggle to get Angstrom Linux to run properly. Yet those niggling problems ...

Getting my Beaglebone Black running was unexpectedly painless. I plugged it into my laptop USB port and it was running. It came up as /dev/ttyACM0 a serial port. No problem, all I needed was minicom, and the default settings of 115200 baud, 8 bits, 1 stop, no parity.


Default account is 'debian' and password 'tempwd'. There is no root password. I did not have to struggle with Angstrom. In fact I forgot to put in the sdcard. That meant it loaded from on-board mass storage. And it was Debian!

root@beaglebone:~# cat /etc/dogtag

BeagleBoard.org Debian Image 2015-03-01

Turned out the onboard memory was eMMC, still flash memory, but in IC form without those dreaded sockets. Memory is 512MB and there is no built-in WiFi; that would come only in the Beaglebone Black Wireless.

From bottom left: USB Master socket, microsd  and the elusive User-boot button


First order of business with Debian is to get it up to date. I connected it via copper LAN to my ADSL modem where it found the Internet on its own. But 'apt-get update' had errors, even though it technically did not fail:

root@beaglebone:~# apt-get update

W: Failed to fetch http://ftp.us.debian.org/debian/dists/wheezy/contrib/binary-a
rmhf/Packages  404  Not Found [IP: 64.50.233.100 80]

W: Failed to fetch http://ftp.us.debian.org/debian/dists/wheezy/non-free/binary-
armhf/Packages  404  Not Found [IP: 64.50.233.100 80]

W: Failed to fetch http://ftp.us.debian.org/debian/dists/wheezy-updates/main/bin
ary-armhf/Packages  404  Not Found [IP: 64.50.233.100 80]

'apt-get upgrade' finished OK:
root@beaglebone:/home/debian# apt-get upgrade

But the version was wheezy, and really old. Not to worry, I reached for the latest images, and downloaded AM3358 Debian 9.12 2020-04-06 4GB SD ImgTec. It only needed a tiny (4GB!) microsd card, and:

$xzcat bone-debian-10.3-iot-armhf-2020-04-06-4gb.img.xz | sudo dd of=/dev/sdc
7372800+0 records in
7372800+0 records out
3774873600 bytes (3.8 GB, 3.5 GiB) copied, 3001 s, 1.3 MB/s

But it did not boot from the microsd, and instead after an hour or so booted from eMMC. Time to Read the Manual. The manual is no fluffy faux-friendly 'Getting Started' guide; it reads like a datasheet with schematics in glorious abundance.

There is mention of a 'Boot button', where if held down and the beaglebone is power-cycled it will force a boot from sdcard. But it did not work - and eventually always reverted to the old eMMC wheezy Debian.

After wasting a couple of days ruling out a hardware malfunction, the problem had to be the Debian image. One hint was that Debian Image 2015-03-01 would not mount  Debian 2020-04-06. That would point to an ext3 filesystem incompatibility. The existing eMMC Debian code would be needed to mount and boot the new Debian before flashing can commence.

And yet all this  has been solved before; one compromise is to use an fossil filesystem (like FAT16) just for booting, and indeed Debian 015-03-01 had such a partition but not Debian 2020-04-06. Usually SoCs have separate bootrom to prevent bricking incidents like this (like its close cousin the Beaglebone White), but this is easy enough to test.

beaglebard.org maintains a complete archive of old images, and hoping for an intermediate Debian that will be compatible with both, I picked Debian 2016-12-09. Then it s a simple matter of:

$xzcat bone-debian-8.6-iot-armhf-2016-12-09-4gb.img.xz > /dev/sdc

And it booted from microsd, just like that.

root@beaglebone:~# cat /proc/version
Linux version 4.4.36-ti-r72 (root@a2-imx6q-wandboard-2gb) (gcc version 4.9.2 (Debian 4.9.2-10) ) #1 SMP Wed Dec 7 22:29:53 UTC 2016

You need to prepare the new image for flashing. Just find the file /boot/uEnv.txt and uncomment the last line:

cmdline=init=/opt/scripts/tools/eMMC/init-eMMC-flasher-v3.sh

To flash the eMMC, I added the 5V power cable, and powered off. Then with the microsd still in, held down 'User boot'  button and powered back on. This worked right off the bat; the blinkenlights did an impression of Pong, and when finished, all lit up, then shut down.

On powering up, and removing the microsd, I get:

root@beaglebone:~# cat /etc/dogtag
BeagleBoard.org Debian Image 2016-12-09

Our imugi is not yet a dragon, but this is clearly The Way. The trusty sdcard is then repurposed with:

$xzcat bone-debian-10.3-iot-armhf-2020-04-06-4gb.img.xz | sudo dd of=/dev/sdc

And now it booted off the microsd. Now all I need to do is to repeat the eMMC flashing process with the latest Debian Image, 2020-04-06. As a precaution I first upgraded without incident:

root@beaglebone:~# apt-get update
root@beaglebone:~# apt-get upgrade

Changed the default passwords did the usual sysadmin stuff. The eMMC flash went without incident, and unlike Zen Cho's Byam, my Beaglebone Black did not turn back but transformed its eMMC to Debian 2020-04-06.

Happy Trails.

Sunday, 19 July 2020

AS3935: The Next Generation Episode 2

Hors de combat: AMS1117-3.3 LDO with crater and ejecta

In Episode 1, I isolated the modem ADSL disconnect relay module, and this setup survived about three months of storms, until this week. The system worked pretty well: the remote AS3935 disconnected the ADSL line from the modem a good 20 minutes earlier, so the problem area was limited to just the relay board. Instead of blowing everything up like my first rig.


Setup at time of strikes


Relay board with ESP-01S dismounted. No obvious burn marks this time.

However the ADSL line is still connected to the relay board pins, a lightning strike first took out the 12V to 5V DC-DC buck converter that served as the power module for the relay board. This caused the output to short-circuit to the input: 12V from the battery now appeared at the relay board power input.

Relay board after the second strike. Note the insulation tape over the relay pins

Now the AMS1117-3.3 LDO power regulator in the relay board is rated for 15V and while it crashed the ESP8266 CPU it probably  did not kill it. It did cause the 5V relays to run really hot. This set it up for the second close strike, just minutes later, which blew a neat little hole in the AMS1117-3.3.

It is very impressive what damage lightning can do. But there seems to be progress. The AS3935 lightning detector allowed an early modem disconnect, which probably saved the modem. And this time round there seems to be a lot less damage, probably because the lightning could not find an easy path to earth. The earlier 'disconnect' signal from the AS3935 module caused a second relay board to disconnect the battery charger from the mains. At the time of the second strike the system had been running off the 12V battery.

Since the strike also killed the 12V-5V DC buck converter powering the relay board from the battery, perhaps disconnecting the ADSL relay board from the buck connector might improve things. It does not really need to be powered up: I can use the relay 'Normally Open' pins to ensure the ADSL stayed disconnected. The relay board's 5V is really close to the ADSL pins as it needed to power the relay coil.

And I can make things a little more robust by using a 12V relay board to disconnect the ADSL relay board and to monitor for the storm's passing so that the modem can be reconnected when it is safe.

Diymore 4-channel WiFi Relay board with serial interface
And as a bonus the module PCB designer has helpfully cut a slot around the vulnerable relay output COMMON pin.

Note the 'U'-shaped slots cut around the relay COMMON pin

The power regulator is still an AMS1117-3.3 but now there is an added 78M05 linear regulator in series. This raises the maximum input voltage (ie the tolerance to surges) to 35V, from the AMS1117-3.5's 15V. Hopefully this is enough, but we are never really sure until the next lightning strike demolishes it. The relay coils are still exposed to the full weight of the surges but they are relatively tougher devices.

The setup is now thus:

System block diagram: the other 2 relays in the 4-channel module are used to disconnect the battery charger from the mains

Next Generation Episode 2 build: from top: 2-channel ADSL relay module, ADSL modem and 4-channel power disconnect module

Thus fortified, we await the next thunderstorm. Indeed I welcome the strikes, for it is looking like my 30-year struggle with lightning strikes may be coming to a close: fiber-optic broadband network has reached my front gate, and the service provider salesman will not be long after. Just when I felt like I am winning.

Fiber at the gates: the end for copper-based ADSL broadband is nigh


What is Ahab without his Moby Dick? Come, lightning and welcome. 


Happy Trails.

Ahab and his whale