Showing posts with label Robot Platform. Show all posts

Tuesday, 28 May 2019

Pan/Tilt Head Using the NodeMCU L293D shield and TowerPro MG-996R Servomotor

Left: Dual TowerPro MG-996R, right: L293D NodeMCU ESp-12E Shield Click on picture for youtube video
I had always wanted a pan/tilt head. There is some deterrence value to the baleful gaze of a pan/tilt camera following your every move. While pan/tilt cameras are cheap and easily available, they are less useful at night: their range is a lot shorter.  It would be nice to move an LED torchlight together with the camera.

You could tape an LED torch onto your favorite IP camera, but the mechanism is often made of  plastic and the extra weight wears it out fast. A homebrew pan/tilt head would be nice ...

The L293D NodeMCU ESP-12E motor shield was such an easy build (see part 1, part 2, and part 3) I quickly bought two Towerpro MG-996R servomotors for just RM22.90 (about USD5) each and matching mounting brackets for RM10.30.

Towerpro MG-996R Servomotor

And matching accessories

The brackets were listed in lelong.com as:

"Arduino Multi Purpose Servo Motor Holder Bracket MG995 MG996"


Arduino Multi Purpose Servo Motor Holder Bracket MG995 MG996

I found the mechanical assembly work quite mystifying, but Starmaxtrek's youtube video was a godsend:

Click on picture for Youtube video on mechanical assembly
Documentation for the MG-996R took a little digging, but you can find a copy here.

For testing, I shorted VM to VCC on the L293D and powered everything from VCC using a USB smartphone charger.  The only change in the ESP-12E program was to change the PWM frequency to 50Hz:
  analogWriteFreq(50);

For my setup I found the servomotors reacted only to PWM values between 1-25%. The shaft rotated some 120 degrees and the pan/tilt head whirred about with a gentle menace.

The youtube video is here.

Life is good - Happy Trails.

Wednesday, 8 November 2017

Controlling the Raspberry Pi Robot Platform from an Android Smartphone

It is sometimes more convenient to control the raspberry pi robot platform from the smartphone.
Raspberry Pi robot platform with smartphone HTML RC control

Perhaps it is because I am now lugging around a 17" Asus X751L laptop.

There are several options. The quickest way is to ssh into the Raspberry Pi using an app like Juicessh. I can then reuse the C programs forward, left and right.

This turned out to be quite limiting, especially at my age. The smartphone keyboard and screen are really too small for the Linux command line interface to be used for a useful length of time.

But that's what rapid prototyping is all about. We build another one as fast as possible, preferably with available resources. Time for the next iteration.

Rather typing a separate command (in this case a bash script) perhaps it is better to make a program to issue direction commands on a single key press. This takes us to the C program arrowkeys.c

The process is really quite quick and simple: I just googled for the code, starting with general terms lile 'linux', 'keypress', 'C language'. C just happened to be the language I am most familiar with. 'python' or your favoorite language should work just as well.

This search leads me to ncurses, the library that I need. We refine the search further by adding 'sample' and 'code', and this time google leads us to to the function I need, wgetch. This in turn leads us to the article 'A Simple Key Usage Example'. I copied the code wholesale, and just had to add the C library stlib.h so that the keypress code can use system() to invoke my direction programs.

            There is the program. You compile it thus:
gcc -lncurses -o arrowkeys  arrowkeys.c

/******************************************************************************
 *                                                                            *
 * Simple program to issue motor commands in response to keyboard arrow keys  *
 * Copied from:                                                               *
 * http://tldp.org/HOWTO/NCURSES-Programming-HOWTO/keys.html                  *
 *                                                                            *
 * 2017-10-24 CM Heong                                                        *
 *                                                                            *
 *                                                                            *
 *                                                                            *
 *                                                                            *
 *                                                                            *
 *                                                                            *
 *                                                                            *
 *                                                                            *
 *****************************************************************************/
#include <stdio.h>
#include <ncurses.h>
#include <stdlib.h>

#define WIDTH 30
#define HEIGHT 10

int startx = 0;
int starty = 0;

char *choices[] =
{
  "Forwards",
  "Back    ",
  "Left    ",
  "Right   ",
  "Exit",
};

int n_choices = sizeof(choices) / sizeof(char *);
void print_menu(WINDOW *menu_win, int highlight);

int main()
{
  WINDOW *menu_win;
  int highlight = 1;
  int choice = 0;
  int c;

  initscr();
  clear();
  noecho();
  cbreak();     /* Line buffering disabled. pass on everything */
  startx = (80 - WIDTH) / 2;
  starty = (24 - HEIGHT) / 2;

  menu_win = newwin(HEIGHT, WIDTH, starty, startx);
  keypad(menu_win, TRUE);
  mvprintw(0, 0, "Use arrow keys to go up and down, Any other key to exit");
  refresh();
  print_menu(menu_win, highlight);
  while(1)
  {
    c = wgetch(menu_win);
    switch(c)
    {
      case KEY_UP:
         highlight=1;
         system("/home/heong/piface/piface-master/c/forward 100");/*2017-10-31*/
      break;
      case KEY_DOWN:
         highlight=2;
      break;
      case KEY_LEFT:
        highlight=3;
         system("/home/heong/piface/piface-master/c/left 100");/*2017-10-31*/
      break;
      case KEY_RIGHT:
        highlight=4;
         system("/home/heong/piface/piface-master/c/right 100");/*2017-10-31*/
      break;
      default:
        highlight=n_choices; /* exit */
      break;
    }
    print_menu(menu_win, highlight);
    if(highlight==n_choices)  /* Exit chosen - out of the loop */
      break;
  } 
  mvprintw(23, 0, "You chose choice %d with choice string %s\n", choice, choices[choice - 1]);
  clrtoeol();
  refresh();
  endwin();
  return 0;
}


void print_menu(WINDOW *menu_win, int highlight)
{
  int x, y, i; 

  x = 2;
  y = 2;
  box(menu_win, 0, 0);
  for(i = 0; i < n_choices; ++i)
  {  if(highlight == i + 1) /* High light the present choice */
    {  wattron(menu_win, A_REVERSE);
      mvwprintw(menu_win, y, x, "%s", choices[i]);
      wattroff(menu_win, A_REVERSE);
    }
    else
      mvwprintw(menu_win, y, x, "%s", choices[i]);
    ++y;
  }
  wrefresh(menu_win);
}

Now arrowkeys worked great on the laptop. But on the smartphone, I had to take my eyes off the robot and look at the screen, and this gets wearing very quickly as there a a lot of motion commands.

What I need is just 3 very big buttons, for forwards, left and right. The obvious way is to use an App, perhaps even write one using the MIT App Inventor.

At this point my smartphone,a Nexus 5 failed. I quickly reverted to my trusty Nexus 1, but in my haste to install the SIM card, I broke the phone's SIM connector. The second backup is a Leonovo A390, which did not have much disk space left after installing Whatsapp.

But we can work around this: if I ran a website from the Raspberry Pi, I can invoke the C motion programs from php, via the function exec(), very similar to the trusty system() function.

This means however I have to come up with the button program in html. The added advantage is it will work both in the laptop and the smartphone.

As you suspected, it is back to google. 'html', 'button' and 'system' eventually led me to the 'form', 'exec' keywords. From there the search narrows down to w3schools.

Not knowing web programming should not stop you: it didn't stop me. If you have a background in at least one computer language you should get by. The result would not be pretty code, but you will have a workable (well, sort of) prototype you can show as plausible progress.

From there on, a full day's frobbing to get the buttons screen just right, in the process discovering CSS 'style' in the process. The resulting program, robot.html and upbutton.php:

$cat robot/piface/piface-master/robot2/robot.html
   <!-- \/ starthtml -->
<html>
 <head>
   <META HTTP-EQUIV="Content-Type" CONTENT="text/html; charset=iso-8859-1">
   <META NAME="keywords" CONTENT="Heong Chee Meng electronics engineer Android Raspberry Pi Robot Platform Control">
   <META NAME="description" CONTENT="Heong Chee Meng's robot control website.">
   <META NAME="author" CONTENT="Heong Chee Meng">
   <TITLE>Heong's Robotic Control Website</TITLE>
 </head>
Heong's Robot Platform Control Website
<p style="float: left; width: 33.3%; text-align: center">
<form action="upbutton.php" method="post">
  <button type="submit" name="buttonu" value="Connect"><img width="180" height="180" alt="Connect" src="./upbutton.svg" align="center"></button>
<! </form>
<p>
<p style="float: left; width: 33.3%; text-align: left">
<form action="leftbutton.php" method="post">
  <button type="submit" name="buttonl" value="Connect"><img width="180" height="180" alt="Connect" src="./leftbutton.svg" align="left"></button>
<! </form>

<p style="float: right; width: 33.3%; text-align: right">
<form action="rightbutton.php" method="post">
  <button type="submit" name="buttonr" value="Connect"><img width="180" height="180" alt="Connect" src="./rightbutton.svg" align="right"></button>
<form action="bleh.php" method="post">
</form>

<p>
</BODY>
</html>
<!-- /\ end html  -->

$cat robot/piface/piface-master/robot2/upbutton.php
<html>
<body>
<article>
<?php
  if (isset($_POST['buttonu'])) {
    $result = shell_exec('ls -l upbutton.svg');
    echo "Done!<pre>$result</pre>";
  }
  if (isset($_POST['buttonl'])) {
    $result = shell_exec('ls -l leftbutton.svg');
    echo "Done!<pre>$result</pre>";
  }
  if (isset($_POST['buttonr'])) {
    $result = shell_exec('ls -l rightbutton.svg');
    echo "Done!<pre>$result</pre>";
  }
?>
</article>
</body>
</html>

You can get the button images from here. Put the files into a subdirectory 'robot' in your apache directory, which in Slackware should be:

/var/www/htdocs/robot/

You start the webserver with

chmod +x /etc/rc.d/rc.httpd

/etc/rc.d/rc.httpd restart


The next step would be to have the phone and the Raspberry Pi log into the same wifi hotspot. This is straightforward if you are at home, just have both your Pi and smartphone log into your wifi hotspot.

If you are on the move (say you need to demo your new prototype at a client's place), just set your smartphone to be a wifi hotspot and have Raspberry Pi connect to it.

If you use static IP (say your Pi is 172.16.1.1) or if you use a DHCP server, the command

dhclient -v wlan0

will display the Pi's IP.

From there it is just a matter of typing in the link into your favourite browser - I used Firefox:

http://172.16.1.1/robot/robot.html

By now I have a spanking new Samsung Note 5, which unhappily was slimmer than the stack of RM50 bank notes needed to buy it.

After playing RC car with the robot (I've always wanted one!) for a while it would be nice to be able to do this remotely, like, over the Internet. This would have telepresence features. Happily, you just need to configure your home wifi modem router to host the Raspberry Pi website, and the same setup should work.

Now that I have the Note 6 I just needed to complete my search for the Android App to do ssh commands with big buttons. The first hit for 'ssh', 'button', 'app' turned up HotButton SSH. Now this should be a lot less painful to get working than html and the only damage would be to my pride.

 
The HTML version's advantage is that it is the same whether you used a desktop, laptop or a smartphone. Best of all, it is easy to link up as an Internet of Things (IoT) device. If you were deploying an interface for, say an MRT SCADA system for both the Station Control Room as well as mobile workers this would be an advantage, especially with training costs.

The moral here is rapid prototyping simply uses the resources on hand. Time is the essence- often it is much easier to find out the faults if you (or the customer) have some form of the prototype to work on. The individual motion programs were not suitable for repeated use, and arrowkeys.c although easy to do (with my skill-set) proved OK for laptop use, but using a laptop proved inconvenient.

It sounds trendy. Indeed DevOps uses a similar approach for its 'Continuous Delivery'  portion, but this approach would sound familiar in the US during the Great Depression.


Happy trails.

Friday, 13 October 2017

Eyes on the prize: Raspberry Pi robot gets a camera

Cheap Mobile Camera: MoboCam

As a mobile camera, the smartphone is hard to beat: it has two cameras, autofocus, front light, backup battery and best of all, virtually no additional interfacing 'glue' hardware. I used my old Samsung Nexus 1, and set it up to log into my WiFi.

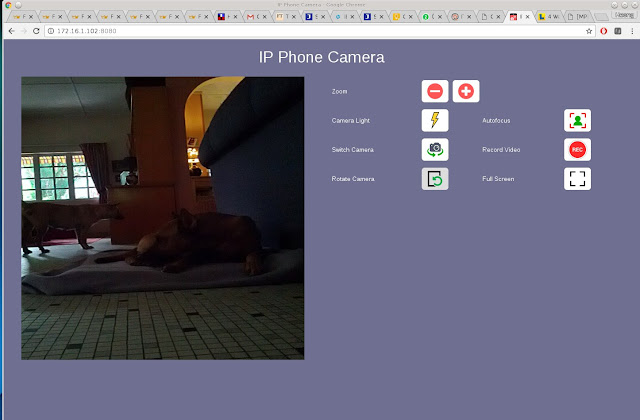
To stream video back to my laptop, I used the App IP Phone Camera by Deskshare. To link to it I simply point my browser to the Nexus 1's WiFi IP address and port 8080:

http://172.16.1.102:8080

Camera and platform is controlled from a laptop
 Typical front camera view:

Let sleeping dogs lie: will they be replaced by AI?
Rear-facing camera view:
MoboCam looks back ...
The nice thing about this is I get to postpone putting in encoders (and the attendant interfacing circuits), motor drives, control software and jump straight to the fun stuff.

The control commands are much the same (see previous blog post):

Command line interface: a proper GUI has yet to be done

 As usual, the smartphone is attached to the platform with a small cardboard box (the same one the Arduino parts came in), duct tape and scotch tape. The smartphone needs to be easily removed and mounted in order to start the app.

It needs to be reasonably rigid: positional accuracy is important to navigate the house. Barely one hour later, assembly was complete and MoboCam made its first remotely-controlled sortie from its birthplace: the study.

First sortie: MoboCam needs to traverse a corridor
It went down a 1m wide by 5m long corridor with no difficulty, mainly because it could center on the bright window at the end. Turn to the left and MoboCam sees its first light of day.

Light of day. Notice Mark I mobile alarm system on front guard duty.
The platform sorely needs two more wheels. It gets stuck very easily: even the thinnest doormats gets stuck on the front and back supports. And it would be nice to be able to reverse.

A dedicated program needs to be done to issue Piface commands on pressing the keyboard arrow keys. A surprising amount of turning was required to orientate myself.

The wheels needs encoders or tachometers to measure distance traversed. This makes it able to be programmed to travel to specific waypoints.

There you have it: the cheap Raspberry Pi robot platform becomes a camera carrier. Possibly applications are a telepresence robot, a mobile house alarm platform and best of all, a fun toy.

In case you are wondering, here is what a cheap Raspberry Pi robot looks like when it is not made from cardboard and duct tape: the Dexter Industries GoPiGo (USD200 or RM840):


GoPiGo3


Happy trails.

Monday, 9 October 2017

Arduino and the Robot

Arduino and the Robot Video (Youtube)

A few years ago, I bought a cheap plastic robot platform to play with. I bolted on two 12V geared motors, a Raspberry Pi with a WiPi WiFi USB dongle and a PiFace Digital,relay board and could drive the platform about. It trailed a 6m power cord. What I needed was a battery-powered system that actually lasted more than 5 minutes.

Unfortunately in 2011 I could not get lithium batteries easily, and so I used lead acid batteries instead. The batteries that were big enough were too heavy for the little platform and they cracked it. The few lithium batteries I had could not last long enough for the Raspberry Pi to power up.

The robot platform languished until I discovered recently power banks and Arduino parts are very cheap and you could buy them online. Enter the Arduino XL6009 5V to 12V converter:

The Arduino XL6009 costs a mere RM4.50
Together with a 20000mAh lithium power bank, which can cost as little as RM70 (I bought mine for RM87) I can now restart the robot platform project.

Rasberry Pi robot platform components (Raspi, Piface, WiPi, XL6009 and power bank) for assembly
Control and extra processing power for is from my Acer laptop. I expect to ssh via WiFi into the Raspi and execute the motor commands using a python script. The Piface relay board do nothing more than connecting 12V to the motors on command. Imaging, GPS and audio will be from an old onboard Android Nexus 1 smartphone, long put aside for a Nexus 5.

 The two motors are Cytron spg30-300k, rated at 12V 430mA (equivalent to 1032mA at 5V) each. Assuming the Raspberry Pi takes 160mA, that is 2224mA. The power bank should last 9 hours at full power. I expect the consumption to be a lot less mainly because it will be moving less mainly for the control program catches up. Anyway I do not expect the flimsy chassis to hold up for 9 hours.

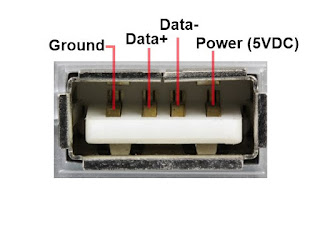
But first, the XL6009 needs to be set correctly. Wire up a USB connector to it. You can cut a USB cable and find the 5V and 0V lines by measurement. Or you can use this:

USB connector pinouts
Or if you have recently discovered Arduino, you could buy an Arduino USB connector breakout PCB for RM2.50:
 Connect the USB connector to the XL6009 inputs and set the potentiometer until you get the right voltage output. My XL6009 was preset to 24V so I had to do a fair number of turns to get it down to 12V.

Setting the XL6009. For convenience I have connected voltmeters to the input and output

The power bank has 2 USB output ports, one at 2A and the other 1A. I connected the 2A output to a Raspberry Pi with a Piface Digital Cape as well as the WiPi WiFi dongle. The assembly took some 400mA at startup and between 100-300mA after.

I first tested the program 'dry', without the motor 12V power. You can tell if the relays are clicking on - besides the sound, there is a corresponding output LED.

Next I connected up the XP6009 to the power bank 1A output. The first time I tried it crashed the WiFi connection to my laptop. It rebooted OK after. Next to reduce the load on the motors, I raised the wheels off the floor so they spun free.

The first time I pulsed the motors on for only 20ms, and that was enough to drag the power bank output down and crash the Raspberry Pi.

Despite lifting the wheels clear, the motor gears must still present a considerable load. I needed to reduce the motor current. 1A seems a nice round number, and if I put a 5R 5W resistor at the 5V input to the XL6009 this should do it. But I only have a 2R7 resistor, and in the interests of expediency I used that, but swapped the motor power to the 2A power bank output.

Raspberry Pi Robot platform, assembled in glorious duct tape
The program is simple. You need the C library supplied with the Piface.

root@piface1:/home/heong/piface/piface-master/c# cat forward.c
#include <libpiface-1.0/pfio.h>
#include <stdio.h>
#include <unistd.h>

int main(int argc, char* argv[])
{
  int ontime=300; /* milli-seconds */

  if ( argc != 2 )
  {
    printf("Usage: %s ms\n", argv[0]);
    _exit(1);
  }
  sscanf(argv[1], "%d", &ontime);
  pfio_init();
  pfio_digital_write(0, 1);
  pfio_digital_write(1, 1);
  printf("Sleeping %d milliseconds\n", ontime);
  usleep(ontime*1000);
  pfio_digital_write(0, 0);
  pfio_digital_write(1, 0);
  pfio_deinit();
}

The command to compile is:
 gcc -L/usr/local/lib/ -lpiface-1.0 -o forward forward.c

To run, you ssh into the Raspberry Pi:
ssh -t 172.16.xx.yy

I find a 200ms pulse produces a reasonable step:

./forward 200
Sleeping 200 milliseconds
For the great finale the wheels were lowered to the ground and the and the command was executed as many times as necessary.

A very simple mod would allow you to make right.c and left.c when direction changes are required. And free Android apps are available to trigger the Pi commands.

The mechanical bit leaves much to be desired: the heavy power bank did not sit square over the wheels, so a left turn is much easier than a right turn. It needed two more wheels rather than those noisy screw heads, and it wobbled horribly, shaking lose its connectors after a few minutes.

And yet, it finally managed to lose its power cord tether and it moved fast enough to alarm Sidney the cat.

There you have it, a cheap robot platform prototype 6 years in the making, finished in one weekend.

Apart from the shakey construction, the power bank needs to be down-rated, and the PiFace Digital needs to be swapped out for a proper motor driver. Given that the processing is done from a host via a wireless link, a Raspberry Pi is overkill; a bluetooth PIC18F14K50 should do.

So, back to the drawing board, back to the pachinko.  In the meantime I see a bright future for the first prototype as a back porch prowler, scuttling back to the solar battery to recharge when low.