 |
| Nick Felke's youtube introductoin |
The usual method to link your ESP8266 to Google Home is via Adafruit and IFTTT. It is free to start with and the sample code is easier to implement.
My autogate works beautifully on voice control, especially when driving. I preferred the homebrew version to the Sonoff version, mainly because I could add a function to crack open the gate ajar, wide enough for a person putting out the rubbish, but not so wide as to tempt the dogs and/or cat to rush out.
To accommodate my sister, I had to dismantle my autogate setup, remove the ESP-01S relay adapter and reprogram it. And add a third feed. This is obviously not going to scale.

One solution would be to hook the ESP-01S relay PCB directly to Google Assistant, just like Sonoff. To add users I simply add them as 'Home Member'. Users are easily revoked via my Google Home settings.
 |
| Adding home members is much easier than reprogramming the ESP8266 |
Luckily Google has provided all you need to do this, a tutorial and sample code. Unlike other code, I found it slower to pick up as there was simply so much to learn (for me anyway). Things like Conversational User Interface, JSON and node.js were quite new to me. But it can be done on the fly mainly because the tutorial and sample code is complete and it works! It helps to start by watching Nick Felke's video.
You will need to sign up for Actions on Google and ngrok. Both have free versions. You do not really need to sign up for ngrok - you can simply start using it, but if you do, that temporary ngrok URL they give you will not expire every few hours, which can be quite annoying especially if you have the whole house's devices set up.
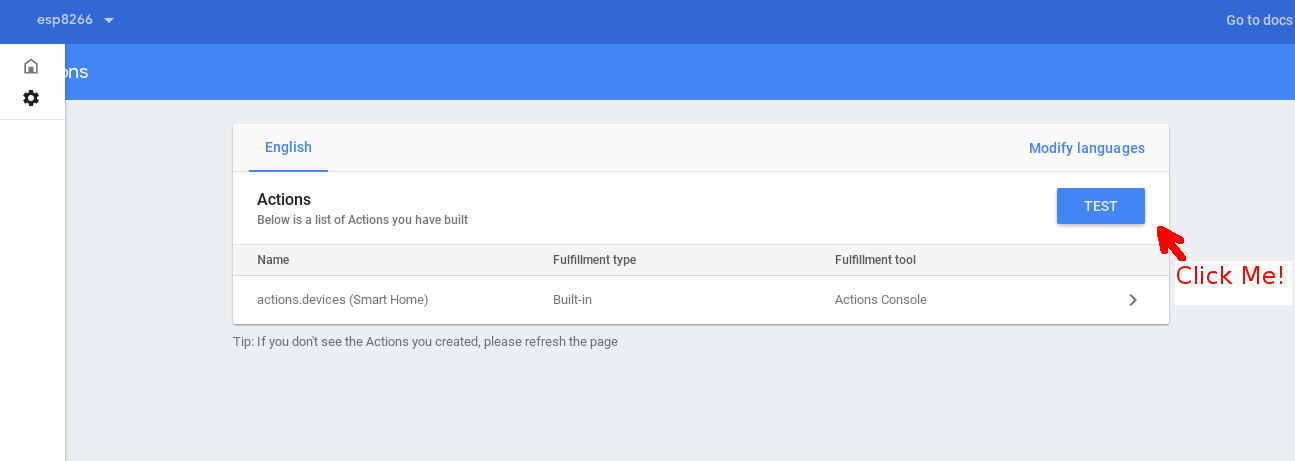 |
| You MUST CLICK TEST whether or not you intend to use the Test Menu |

When you try to link your Google Assistant on the phone to smart-home-nodejs-master you should get a login screen like above. It is likely it will login slowly (probably because of ngrok) and it helps to wait for it to finish before pressing 'Login' again. You can monitor smart-home-nodejs-master's output to be sure it has finished.
At this stage you should have a working template, and all the IoT 'devices' are being simulated by smart-home-nodejs-master.
To add real ESP8266 devices you will need to add a webhook to the file smart-home-nodejs-master/smart-home-provider/smart-home-app.js. Don't worry!. webhooks are new to me as well.
Recall that the IoT ESP-01S Relay is turned on from the browser with a command like:
http://12.34.56.78:8080/gpio/1
Or off:
http://12.34.56.78:8080/gpio/0
If you need it run from the command line you can use the Linux program lynx thus:
lynx -dump -cmd_script=/home/fred/lynx_script http://12.34.56.78:8080/gpio/1
You will first need to generate the file lynx_script thus:
echo "exit" > /home/fred/lynx_script
Now you will need to get the program smart-home-nodejs-master/smart-home-provider/smart-home-app.js to call you lynx command. This you can do by using the 'child_process' library. You need to insert the code into the execDevice() function (typically at line 520):
if ( execDevice[device.id].properties.name.nicknames == "My Test Lamp" && execDevice[device.id].states.on) {
var exec = require('child_process').exec;
var cmd = "lynx -dump -cmd_script=/home/fred/lynx_script http://12.34.56.78:8080/gpio/1"
lampon = exec(cmd, function(err, stdout, stderr) {
console.log(stdout);
});
}
if ( execDevice[device.id].properties.name.nicknames == "My Test Lamp" && !execDevice[device.id].states.on) {
var exec = require('child_process').exec;
var cmd = "lynx -dump -cmd_script=/home/heong/IoT/lynx_script http://12.34.56.78:8080/gpio/0"
lampon = exec(cmd, function(err, stdout, stderr) {
console.log(stdout);
});
}
Next log into your ngrok url (https://12345678.ngrok.io) and add a new device, the Monochrome Light. Change the nickname to 'My Test Lamp'
 |
| Add a new device, 'Monochrome Light' and change the nickname to 'My Test Lamp' |
You should now be able to control the ESP-01S Relay PCB using the voice command "OK Google, turn on My Test Lamp"
There you have it, a voice-activated IoT device easily expanded to include other Home Members and even the occasional dinner guest. There is no reason why this should be limited to little dinky IoT devices. You can webhook desktop or server functions the same way: "OK Google backup my main server".
Happy Trails.
No comments:
Post a Comment