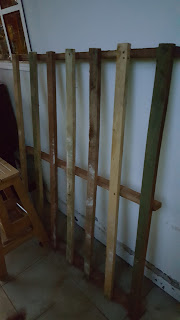
When the MRT project finished last July I had been almost three years continuously on-site and needed a change. A couple of new houses were being built near us and I noticed a lot of lumber were being burnt. Some of it had been used as concrete molds but most of it were used pallets.
I dragged some of the lumber home bought some cheap hand tools and dismantled the pallets.
It is quite a satisfying experience ripping apart stuff with crowbars and sledgehammers but I quickly found that extracting nails reliably required some finesse. The claw hammer and the crowbar broke the nail heads off too often, and all too often in the best pieces.
I bought an old-fashioned pair of pincers and by the third pallet could get every nail out. Even when the claw hammer broke the heads off the pincers could still save the day. This meant I could work the pallets quickly with the crowbar and hammer and revert to the pincers when I had a stuck nail.
When the wood was planed, much to my surprise some were hardwood: keruing, meranti and nyatoh. Some were almost scrap wood (and rightly so given most are burned), part-bark or knotty but a lot were usable. Meranti is endangered; it seems almost criminal to burn it.
In secondary school (high school) I did three years of Industrial Arts. It is a little like trade school- we did electrical wiring, engine maintenance, metalwork and woodwork. I loved the wood work and became really good at it. It helps if your family has a hardware store and you can get your lumber replaced when you mess your project up.
I approached my new hobby like I do my design: I searched the Internet. It was a real eye-opener. Back in the 1970s we used hand tools: jack planes, mitre gauges, set squares, handsaw, chisels. Now there are power tools for everything and you can work really fast. There are power jointers, table saws, power sanders, jigsaws, circular saws. For measurement you now have lasers which actually trace out a true line on the workpiece itself without marking it.
And youtube now has a video for nearly any aspect of woodwork, some by master carpenters. Instructables has some really good designs with complete instructions. It is good to be alive.
I bought a power jigsaw- I thought I would start small in case I lost interest in it. That enabled me to repair a long-broken shed door and seal up the shed so that rats could no longer set up there.
 |
| Power Jigsaw |
Next I got a power handplane. That was less satisfying- youtube had not reckoned on tropical hardwoods. In no time the blade was blunt and fairly skipped over the hardwood like a water skier. The jigsaw suffered less - it was capable of cutting through metal.
 |
| Power plane |
 |
| Circular saw can kick back |
 |
| Old school: tenon saw |
I practiced the youtube master carpenters' techniques on pallet wood with some success, starting on the foreign temperate soft woods. The hardwood was extremely tough going, especially an antique piece of chengal (chengal is nearly extinct in Peninsular Malaysia. Our family store used to sell it but I have not seen it for 30 years). The chengal was so hard the tenon saw was heating up like it was sawing metal. I was not going to give up on it.
 |
| Razor sharp: Bahco Superior 2600 |
I got out the sharpest saw I have, a Bahco Superior 2600 which for 20 years I have been using to trim hardwood trees in the garden. That did the trick: between the youtube sawing techniques and the Bahco I could make true cuts without getting too tired.Because the Bahco saw groove was quite big, I needed to be very careful marking the wood- it is easy to end up with a piece that was too small.
I needed something to replace that power plane, and was looking for the only thing I was familiar with, a Jack Plane. But the power planes are all the rage these days and the jack plane was more expensive (over RM300) than its powered replacement! And it took two weeks to arrive.
 |
| Jack Plane |
Happily I found an extremely cheap and suspect pair of hand planes from my favorite neighborhood hardware store. They were so cheap and nasty (RM40 for two) that the proprietor was reluctant to sell it, fearing I would have a bad experience with it.
 |
| Cheap and cheerful |
I was all set. First I needed a workbench so the first batch of reclaimed wood became just that.
 |
| Palletwood workbench |
Next I made a little stool to go with the bench. This time instead of building it with butt joints and holding it together with steel screws I got a little more ambitious and went for lap joints and wood glue. The glue was a revelation. It was incredibly strong, stronger than the wood and hardwood at that.
I had to relearn my jointing and sawing; the stool ended up a little squiffy but was very strong.
That was August. It is now mid-November and the rainy season means I am indoors a lot and pallet woodwork is starting to look inviting again. I thought I would try for another table, but this time better finished, even stained and polished. I put in an online order for that Jack Plane.
The tabletop is mostly 4"x0.5" pallet planks planed true by hand and glued together. It is a little rough in spots because of the odd knot and because I had failed to match the grain when I lined up the boards to be glued. But it is mostly there and I figure it can be smoothed with a sander.
 |
| Palletwood table top. Note the magic glue. You can never have too many clamps |
Because of the size of the top, the plane was to hold it in place with glue, then reinforce it with a few steel screws. Fastening hardwood with screws with precision was unexpectedly difficult. The holes need to be drilled in advance or the wood might split especially at the ends.
 |
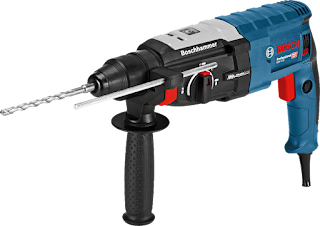
| More power! The battery powered drills do not play well with hardwood. |
More often the wood was so hard the screw heads simply stripped or the screw got stuck. There are very few thing more disheartening than stuck screws. Another unpleasant surprise was a stuck power drill (used as a power screwdriver) can blow the house mains fuse, but mostly you just released the magic smoke.
Going back to basics was not an option this time. Using a hand drill on hardwood is far too exhausting.
 |
| One for the museum: a hand drill |
After the glue was applied, aligning the holes became difficult, after which the screw might again get stuck. Sometimes a screw does not penetrate the second piece properly and when forced in can act like a little crowbar and pry the pieces apart.
Then there is the drilling. Power drill bits for woodwork was unexpectedly difficult to buy, especially the smaller sizes. And the smaller bits are the ones that tend to break. After breaking all the bits in a single session I ended up using bits meant for metalwork. These went in readily enough, but the flutes do not excavate the waste wood well enough, resulting in a stuck bit. Even the carpenter's pincers were no good on a stuck bit- the high-speed steel is too brittle and snaps off.
Eventually, I found the waste wood can be excavated by repeatedly withdrawing the bit. The advantage of the metalwork bit is that if the wood is too hard to drill properly, I can simply set the speed to high and the resulting friction simply burns the bit through the hardwood. This should be done sparingly to minimize the burnt area. Adding small amounts of WD-40 also seems to help. This is very hard on the power drill so you need a good one.
 |
| WD-40: your magic cure for all things stuck |
The glue dries in 24 hours, so wish me luck. In the meantime, in the spirit of Tim Allen's Home Improvement, "More power!" to you.


This comment has been removed by the author.
ReplyDeleteThank you for this insightful article! Your recommendations for finding a skilled Custom Trim Work Near Me were so helpful for my project. I love how you broke down the process and key qualities to look for. Grateful for your expertise and tips!
ReplyDeleteThis is such a helpful read. Thank you for making the process of evaluating Construction Services feel less stressful.
ReplyDelete